Pages

Showing posts with label ribbon. Show all posts

Saturday, December 31, 2011

Butterick 4967

***The pictures are a quick well-after-the-fact. This is NOT how she looked! ***

This dress was made for Ann so that she can wear it to the Mount Pleasant Baptist Church Annual Christmas Banquet this year. She chose the pattern and the fabric.

As bad as I wanted to do the long white version (c), we had to settle for the three tiered pink version (b) because of fabric constraints. Everything came from the stash (except for the zipper). I really didn’t know how I would lengthen the dress (and keep the tiers even) because my daughter is tall for her age. I just left it as is. So, needless to say, she will get one wearing out of this dress.

Front wo bolero

Description: The pattern is labeled easy. After it was constructed, I would say that it lived up to it’s description. It was pretty easy. It’s a girls’ lined, sleeveless dress with tier variations and back zipper and a cummerbund.

Size: The size range are from 2 to 5 and 6 to 8. I cut the 7 by measurements and should have cut the 8 for the length.

Did it look like the photo or drawing on the envelope? Yes, it does. Almost even down to the color. Ann chose green to tie in for Christmas. I was hoping she’d chosen the red plaid, but this is her dress and she’s got to like it. Besides, I won’t be the one wearing it.

back wo bolero 

Were the instructions easy to  follow? Yes, they were very easy. I would like to warn the beginning sewists to make sure you keep your flounces labeled. One mistake I made was misreading the cut line for the stay pieces. I believe this could have allowed me to add at least one more flounce.

Fabric used? Ann chose white taffeta just like the photo and a forest green taffeta for the cummerbund.

Pattern alterations or design changes? First, since the dress is a bit short, I serged the flounces only. I did not turn up a hem. On top of the serging I put a silver ribbon as trim and used the same ribbon for little bows on the last flounce and one bow centered at the top of the bodice.

skirt w bows

I did not use the hook and eye that the pattern called for because, well, to be honest I just didn’t want to. Lastly, I did not use the pattern piece for the cummerbund. I cut wide piece of fabric, fit it to Ann, sewn to the dress via the zipper and added little tacks to hold it in place in the front. I omitted the flower.

Will I sew it again? Do I recommend? Well, since this is for an occasion, I may not. However, I will keep it in the stash because the two year old might want one when she’s this size. Yes, I recommend this dress for those who have not sewn it and may be wondering if it is at all worth sewing. it could possibly be sewn casually in denim, too.

front w bolero

Bolero up close

FWB again


Conclusion: Very cute dress. Age appropriate. Has endless possibilities.

Back with bolero

The Bolero is from another pattern. I forgot which one and the package has been playing hide-and-go-seek since I finished it. It was made because the arm pits were low. I saw this after I was finish and because of the cool weather.

Until, later.

Sunday, March 14, 2010

Pattern Review 2010 Bag Challenge Final Phase

OK! We have all waited for this finale to come. I know I have! From having to sew, resew, rip, rerip, curse, recurse, I think all is well.
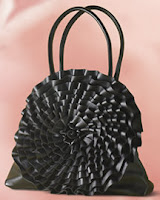
This was the first bag I saw and just was not, could not, and did not pay $59.00 for it. I thought oh well, out of site out of mind. Then I saw the Vogue 8642 bag. But I couldn't afford the pattern either and I missed the Hancock sale. Sew, I decided to do what any seamster would do...SEW IT MYSELF! Ha ha.
With no further ado, I present to you my new bag:

Front.

Front.


Back. The color is way off in this shot. It is burgandy not red nor fuscha.

You can read a review I done for this bag on Pattern Review.
Thank you for you time and I hope to see you again for the next project.
Schey

Pattern Review 2010 Bag Challenge Phase 3

I have had a hiatus from sewing because of classes (Healthcare Management), colds, camera needed batteries, needed to find some more chain... you name it, I had it, needed it, or was short of it. Anyhow, here is another phase of this gorgeous bag construction.

This shows the chain put on the hardware that was sought and bought from a bag from the Goodwill.

It was mandatory to have some sort of organization. Sew, I remember seeing this organization strip commercial and decided to knock it too. I muxt admit, I could have done a bit better, but with time restraints and other things that was not feasable. But this strip measured 24" by 4" before construction .

I serged the longer ends and folded down 1" from the top...pinned....

Then I turned the bottom portion into the top portion...pinnd and then sewed a 3/8 seam allowance. On both sides, people.

Next, I made little sections of varying sizes to accomodate my needy things. There is a space big enough for a few cards and my DL. A space for a couple of pens, a tube of lipsyick, ...

A pack of napkins, a tube of hand lotion or cream...

This is the org strip turned with the items on the inside...

Now the items are turned with the items on the outside.

A view with the org strip inside the bag.

Well, you are going to have to read the next blog to see the Standing Ovation for the knocked off
bag that I sew fell in love with.
Until later,
Schey

Friday, March 12, 2010

Pattern Review 2010 Bag Challenge Phase 2

Now, I have been out of commission for a little while due to the weather, kids had colds, I had migraines, and not to mention my classes...but I am BACK! Seewwww, let's get back to business. I have been working on this bag VVEERRYY little at a time. But, today, I have got some progress going because as of right now, there is only 3 days left. Here's what the bag went through to get here today:

 To rose or not to rose. I am talking about the middle of the ruffles. I could not get this mess right for the sake of my soul!!! Oh, my freakin' goodness! The middle looked like someone had made a squirt or poop right n the middle of the ruffles. Sew, out went the dreadful want-to-be-but-not-really-made-it rose. In came the button-that-want-to-be-a-brooch oh sew pretty in the middle of the ruffles. After having said every curse word in the book and making some up of my own as I went along, it was time to call it QUITS.

First of all, the color is all WRONG! It is Burgandy! The holes are for the hardware that will hold the clamps for the chain strap. The pic to the right shows the hardware from the back of the bag.
This photo shows the hardware holding the clamp that will hold the chain strap. I still have to get alonger length. 1 foot was NOT enough!


Showing the magnetic clamp. This is how the purse will close. Clamp, crackle and pop. Well let's not hope sew.  


Showing the inside lining with magnetic closure. You can also see how the metal rods go through the corners.


GOOD BYE YOU AWEFUL, DREADFUL, UGLY ROSE. AND DON'T YOU COME BACK NO MORE, NO MORE, NO MORE, NO MORE!

Until later,
Schey

Pattern Review 2010 Bag Challenge Phase 1

This a purse, bag, or whatever you want to call it, that I saw on NewPortNews.com recently. I later saw it on the VoguePatterns. I so love this pure. I do not so love this purse to pay for it. Let alone pay full price. Sew, what does any seamtress or sewist does when they want something but refuse to pay what's on the price tag? Well darn it, we make it ourselves. Sew that's just what I am going to do! Here's the one to Vogue:http://voguepatterns.mccall.com/v8642-products-10784.php?page_id=181. I am referencing to the cream colored rose bag. What a Beauty, huh? Well, here is what has happened to the bag so far.

1. This the burgandy velvet for the main bag.
2. The black pellon that will help to keep shape of the said bag.
3. Gold ribbon that will attempt to be ruffles for the rose.
4. The gold lining for the inside of said bag.
5. A few of my pattern pieces that I made up while trying to emulate said bag.
6. Last, there are a few hardware pieces that revived from other purses that no longer live.


The photo to the right does no justice for the color of the lining but it shows the detail of the design very well. The color in the first picture is closest to the real thing.


The lining is all sewn and ready to go. I will do a removable compartment that will help with organization. But that will be the last thing I do.


The Ribbon is ready to go. I started this round and round we go and have a bit more to do. The ruffies are read to be ruffled.


The rest of the ribbon to be ruffed.


Bag Challenge Phase 2
Bag Challenge Phase 3
Bag Challenge Final Phase